Table of contents
Have you ever wondered how you're able to interact with the Google Docs application on the web and type in a bunch of text, add images and links and so on, well I have!
So in this article, we'll create a simple rich text editor, which allows you to type in text with different headings, supporting some markdown features, unfortunately not all but it's really cool what it can do.
Here's what we'll be building together, pretty basic but it's a rich text editor. Feel free to play around with it.
How I came about CKEditor?
If you don't care about the back story, click here to go to where we'll build the Rich Text Editor.
While playing around with textarea element on the browser I found out that it accepts HTML elements, and they can be added to the DOM using JavaScript as HTML elements.
To try this out, type in any valid HTML element in the codepen textarea below, then click on the submit button.
Hopefully, you've tried out the codepen above, If you notice whatever valid HTML element you input the textarea gets output just as an HTML element on the browser. That's really cool if you ask me.
So that's how the thought came, why do I have to type a statement like this <h1>Hello</h1> every time into the textarea box. Isn't there an easier way to just click on a button which is meant for the heading <h1></h1> then type in some contents which will be represented like this <h1>Contents are here</h1>?
Then I gave it a shot, tried my best to implement the functionality but failed, so I had to look for an alternative and that's how I found the CKEditor, which does exactly what I thought of.
CKEditor
The CKEditor is a smart rich text editor with collaborative editing. Well, we'll be building a really simple text editor, nothing too complicated but with lots of awesome features.
For this tutorial, we will be using CKEditor 5, which is the latest version and also making use of the Classic editor which is one of the builds provided by CKEditor.
CKEditor provides 5 different builds which are essentially different ways to set up the rich text editor.
Please I advise you to click on the different builds link above to explore.
Getting Started
We'll be needing three files to work on this project, which are index.html, style.css, main.js. Firstly open up the index.html file.
HTML
The first thing we'll need load the classic editor build with the CDN shown below in the index.html file at the head element.
   <head>
      ....
      <script src="https://cdn.ckeditor.com/ckeditor5/28.0.0/classic/ckeditor.js">
   </head>
Next off, we'll need a textarea and a button element mainly, followed by a div element where all the data from the editor will be added to as a card component. View the HTML file below:
<!DOCTYPE html>
<html lang="en">
  <head>
    <meta charset="UTF-8" />
    <meta http-equiv="X-UA-Compatible" content="IE=edge" />
    <meta name="viewport" content="width=device-width, initial-scale=1.0" />
    <title>Rich Text Editor</title>
    <link rel="stylesheet" href="style.css" />
    <script src="https://cdn.ckeditor.com/ckeditor5/28.0.0/classic/ckeditor.js"></script>
  </head>
  <body>
    <h1>Rich Text Editor</h1>

    <textarea name="textarea" id="textarea" cols="30" rows="10"></textarea>

    <button id="submit">Submit</button>

    <div class="output">
       <!-- What you type will appear here -->
    </div>

    <script src="main.js"></script>
  </body>
</html>
Also, notice that there's an external script file named main.js. That's pretty much all there is for the HTML file.
If you're wondering, why are we using a textarea element, well it will get replaced to the Classical Editor once we load in the JavaScript file.
CSS
The stylesheet is really basic, I'll leave you to go through it, but nothing much is going on.
body {
  font-family: 'Segoe UI', Tahoma, Geneva, Verdana, sans-serif;
  width: 90%;
  max-width: 1000px;
  margin: auto;
}

h1 {
  text-align: center;
}

p {
  word-wrap: break-word;
  overflow-wrap: break-word;
}

.card {
  box-shadow: 0 0 10px rgba(0, 0, 0, 0.274);
  padding: 0.1rem 1rem;
  border-radius: 10px;
  min-height: 200px;
  height: 200px;
  background: #fff;
  overflow: hidden;
  word-break: break-word;
  white-space: normal;
}

.card:hover {
  overflow: auto;
}

button[id='submit'] {
  width: 100%;
  padding: 0.5rem 1rem;
  margin-top: 1rem;
  font-size: 18px;
}

.ck-content {
  min-height: 300px;
}

.output {
  position: relative;
  display: grid;
  grid-template-columns: repeat(3, 1fr);
  grid-gap: 10px;
  margin-top: 2rem;
}

@media (max-width: 480px) {
  .output {
    grid-template-columns: 1fr;
  }
}
JavaScript
First, we select the appropriate elements we will need, such as the div element with the class name of output where all the cards containing whatever we type into the editor will be, the submit button, and the text area.
const output = document.querySelector('.output');
const submitBtn = document.querySelector('#submit');
const textArea = document.querySelector('#textarea')
Next off, we need to call the method ClassicEditor.create() which takes in an argument which is the textarea element, which is referenced with the variable textArea.
 ClassicEditor
        .create( textArea )
        .catch( error => {
            console.error( error );
        } );
The snippet below, is to catch any unforeseen errors that might occur, which means a promise is being returned by the method
ClassicEditor.create().catch( error => { console.error( error ); } );
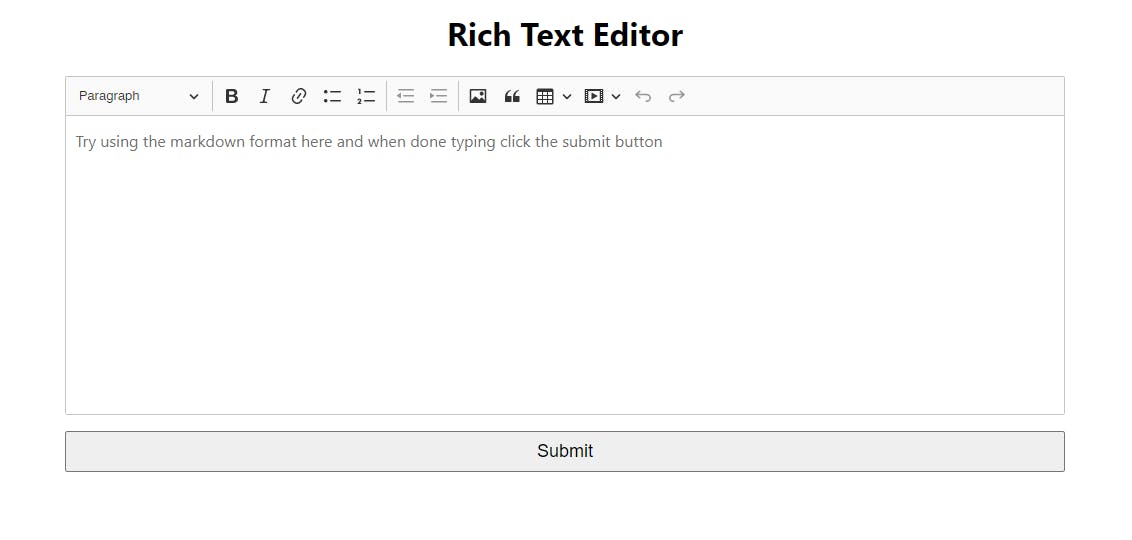
Here's what should be shown on the browser if you've followed along so far, so it there's any issue please do traceback.

Looking at the image above you'll notice there is an icon for adding images though it wouldn't work without some configuration and that adds more complexity to the simple Rich Text Editor, we are building.
If you love to be able to add images to the CKEditor, please do read the docs here: Custom image upload adapter
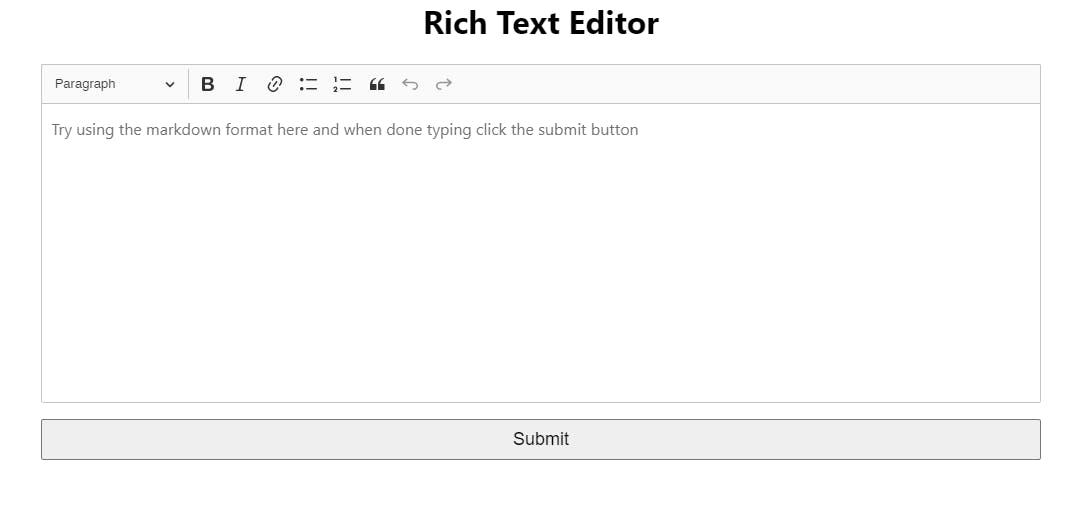
So, what's best is to remove the feature completely and any other feature that isn't needed (this is my preference, please feel free to play around the documentation to learn more) and make the Classic Editor as clean as possible. In other to do so, we'll need to change the default configurations that the CKEditor provides by added curly braces {} next to the textArea variable.
ClassicEditor.create(textArea, {
  toolbar: [
    'heading',
    '|',
    'bold',
    'italic',
    'link',
    'bulletedList',
    'numberedList',
    'blockQuote',
    'undo',
    'redo',
  ],
})
  .catch(error => {
    console.error(error);
  });
So essential the toolbar property holds an array of all that should be shown by the editor and now you should have this:

I'll advise you to get your hands dirty with the code, try breaking things and not just only follow along, if you lose track just Ctrl + Z 😉
Now we need to add the final functionality, which is to generate cards that contain what we type into the editor. To do this, we'll need to create a variable that would hold what is typed into the editor.
const textArea = document.querySelector('#textarea')

let editor;

ClassicEditor.create(textArea, {...}
Then the ClassicEditor.create() method is to return a response data which will be captured by the .then() method.
.
.
.

let editor;

ClassicEditor.create(textArea, {
  toolbar: [
    'heading',
    '|',
    'bold',
    'italic',
    'link',
    'bulletedList',
    'numberedList',
    'blockQuote',
    'undo',
    'redo',
  ],
})
  .then(newEditor => {
    // notice the editor variable here is
    // holding the response daa from the editor
    editor = newEditor;
  })
  .catch(error => {
    console.error(error);
  });
By following the above snippet the variable editor will be holding an object with the contents that are typed into the editor.
Now, we need to work on the submit button, so when there's a click on the submit button a card will be generated with the contents from the editor.
submitBtn.addEventListener('click', () => {
  const editorData = editor.getData();

  if (editorData) {
    output.innerHTML += `
      <div class="card">
        ${editorData}
      </div>
    `;

    editor.setData('');
  }
});
From the above snippet, the submitBtn has a listener for a click event, which then evokes the callback function.
Notice, editor.getData(). So getData() method is used to get the actual translated HTML elements from the editor, which is then held in the editorData variable.
Then, an if condition is next if editorData is true - meaning if it contains a string with contents, then the output innerHTML should be editorData. After this is done then we clear the contents in the editor setting the contents to an empty string with editor.setData('').
Here's the complete codebase:
const output = document.querySelector('.output');
const submitBtn = document.querySelector('#submit');
const textArea = document.querySelector('#textarea')

let editor;

ClassicEditor.create(textArea, {
  toolbar: [
    'heading',
    '|',
    'bold',
    'italic',
    'link',
    'bulletedList',
    'numberedList',
    'blockQuote',
    'undo',
    'redo',
  ],
})
  .then(newEditor => {
    editor = newEditor;
  })
  .catch(error => {
    console.error(error);
  });

submitBtn.addEventListener('click', () => {
  const editorData = editor.getData();

  if (editorData) {
    output.innerHTML += `
      <div class="card">
        ${editorData}
      </div>
    `;

    editor.setData('');
  }
});
Note: If you've ever wondered why a string like an HTML element
"<p>Helllo</p>"can be added to another HTML element, just like we did above well its becauseoutputis a valid HTML element. So anything aside from an HTML element wouldn't be able to add a string HTML to the DOM.
Get the code here:
Do checkout CKEditor documentation to know more about what they over: CKEditor Docs
Well, that is it, I hope you've learnt one or two things. I felt like sharing, hope you have a good day. Thanks for Reading

