# Let's build a game using JavaScript
Hello 👋, In this article, I'll share how I built my first game written in Javascript and my thought process in making the game. Hope you'll follow along and learn something new. Okay then, let's go over the rules of the game for us to understand the game.
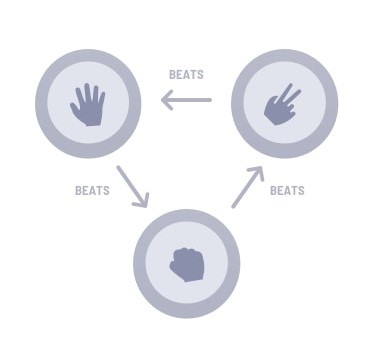
If you've ever played the game called Rock, Paper, Scissors you'll already be familiar with the rules of the game. But if you've never played the game, here are the rules:
## Prerequisite
- Basic knowledge of HTML
- Basic knowledge of CSS
- Basic knowledge of the Command Line Interface
- Basic knowledge of JavaScript
## Why I took this challenge?
> Storytime 😁, if you're not interested [click here](#next1) to move to the next section.
Before why, this challenge was provided by [frontendmentor.io](https://www.frontendmentor.io), which is an amazing platform to test and improve your Frontend skills. I'll advise you to check out some of the challenges on the platform yourself.
Click here to download this project file from [frontendmentor.io](https://www.frontendmentor.io/challenges/rock-paper-scissors-game-pTgwgvgH) so that you can follow along. _It's totally fine if you don't want to get the project file, just reading how I made it is fine._
Before agreeing to attempt this challenge I've always run away from the challenge saying it looks too complex not until I saw that @[Victor Ikechukwu](@VickyIkechukwu) had completed the challenge. I was amazed that he had already done the challenge I considered hard, so I made up my mind to take up the challenge, how hard could it be? I said.
Here's the live demo if you'll like to play the game:
- [Live Demo](https://rock-paper-scissors-game-zeta-one.vercel.app/)
- [Github code](https://github.com/jomefavourite/Frontendmentor_rock-paper-scissors-master)
## Set goals I implemented
> Another storytime 😁, if you would like to skip the section [click here.](#next2)
Upon every challenge I take, I'll always want to try something new, so I planned out what I'll like to practice and learn while on the challenge.
- Making use of Dart SCSS/SASS (Syntactically Awesome Style Sheets) which I had never used.
- Making use of just vanilla JavaScript.
- Making use of Functional Programming Paradigm to the best of my abilities and lastly
- Using BEM (Block Element Modifier) methodology for naming class names.
Actually, I got the idea of implementing the functional programming paradigm, after reading this article [Functional Programming with JavaScript](https://saurabhkamboj.hashnode.dev/functional-programming-with-javascript) by @[Saurabh Kamboj](@saurabhkamboj).
I've never been a big fan of the Object-Oriented Paradigm, so why not learn the Functional Programming Paradigm instead, I concluded.
## Setup for the project
Whenever a challenge is downloaded from [frontendmentor.io](https://www.frontendmentor.io/challenges) all files needed like the HTML file with all the text used for the challenge, the colours used and also the designs for both mobile and the desktop view will be provided.
> For the next couple of steps, we'll need Node.js installed first, which comes with NPM (Node Package Manager) for us to get started.
> Click here to download [Node.js](https://nodejs.org/en/)
First thing first, we'll need to run this command `npm init -y` on the terminal to keep track of all the dependencies for the project.
> Dependencies are the packages that are being used in the code of the project. For example, if my application is working with SASS then there may be a dependency of SASS node package in the application.
> [Click here to read more about what's dependencies.](https://javascript.plainenglish.io/what-the-dependency-types-of-dependencies-in-a-node-js-application-explained-904a5424fbd3)
Running the above command will generate a `package.json` file which shows the dependencies used in the project and also information about the project, for now, there are no dependencies.
Then to install SASS, from NPM (Node Package Manager) through Node, type in the command below on the terminal which installs `sass` globally on your system.
```
npm install -g sass
```
> -g is a flag that represents global
> I've written an introductory article about SASS, you could read that by [clicking here](https://favouritejome.hashnode.dev/write-css-with-superpowers-using-sass).
Now that `sass` has been installed globally on our system, we'll need to install it on our project directory, to make it work in the directory through this command.
```
npm install sass
```
> Notice, two files will be added to the project directory
> `./node_modules` which contains libraries downloaded from npm for `sass` to work.
> `package_lock.json` which contains the several dependencies `sass` needs to work.
Yes! finally, we've got SASS installed and ready to be used. Now, the next step is to open the `package.json` file. We'll need to add a command that compiles our SASS files into a plain CSS file which the browser understands.
Navigate to the `"script"` key, replacing it with the command below
```json
"scripts": {
"start" : "sass --watch scss:css"
},
```
Once the command is set up, we can watch the changes made in the `scss` folder which will be containing all our SCSS modules and then generates a `css` folder with the plain CSS, to which the HTML file will be linked to.
From the command above, `sass` watches every file in the directory/folder named __scss__ and compiles all the SCSS files into a single CSS file in the directory/folder named __css__. The CSS file compiled is what the browser can read and interpret.
To initialise the watch, type the command below into the terminal.
```
npm start
```
By doing this every change in the scss folder containing the `scss` files will be compiled into one `css` file.
> Don't run the command yet, because we don't have our scss folder created yet
The next step is to create a folder named __scss__, which will contain all the scss files needed for the project. When the folder is created, create a new file named `_base.scss`.
`_base.scss` is a partial file that's not compiled until it's imported to the main stylesheet style.scss. This file contains resets, variables, mixins, and any utility classes used throughout the project.
Since we are making use of colours that have been provided in the `style-guide.md` file by Frontend mentor, open the `style-guide.md` file copy all the colours including their names, into the `_bass.scss` file.
After copying the colours, make it have the structure as shown below.
```css
/* _base.scss */
:root {
--scissorsGradient: linear-gradient(hsl(39, 89%, 49%), hsl(40, 84%, 53%));
--paperGradient: linear-gradient(hsl(230, 89%, 62%), hsl(230, 89%, 65%));
--rockGradient: linear-gradient(hsl(349, 71%, 52%), hsl(349, 70%, 56%));
--lizardGradient: linear-gradient(hsl(261, 73%, 60%), hsl(261, 72%, 63%));
--cyan: linear-gradient(hsl(189, 59%, 53%), hsl(189, 58%, 57%));
--darkText: hsl(229, 25%, 31%);
--scoreText: hsl(229, 64%, 46%);
--headerOutline: hsl(217, 16%, 45%);
/* Background */
--radialGradient: linear-gradient(hsl(214, 47%, 23%), hsl(237, 49%, 15%));
}
```
> I decided to make use of the css custom variable for the project instead of scss variable, why? I don't know 😂.
The next step is to click on the link to the font at the `style-guide.md` file to grab it from google fonts. Adding the `@import` rule with the font name to the `body` selector.
```css
/* _base.scss */
@import url('https://fonts.googleapis.com/css2?family=Barlow+Semi+Condensed:wght@400;600;700&display=swap');
:root {...}
body {
font-family: 'Barlow Semi Condensed', sans-serif;
}
```
Now that we got all our set up ready, it's time to actually start coding, by inputting the command we failed to run since we didn't have __scss folder__ before.
```
npm start
```
By running the command above, a css folder is auto-created containing the `style.css` and `style.css.map` files.
## Let's start coding
Before proceeding any further, let's take a look at the project folder structure, to make sure we are at the same pace.
```
css
|__ style.css
|__ style.css.map
design
|__ ....
images
|__ ....
node_modules
|__ ....
scss
|__ ....
.gitignore
index.html
main.js
package-lock.json
package.json
README-template.md
README.md
style-guide.md
```
Okay then, the HTML file is shown below, notice the class names are all named following the BEM (Block Element Modifier) methodology (at least most of them 😃).
> Read this article to know more about [BEM](https://css-tricks.com/bem-101/)
If you're wondering why BEM, it just makes it easier when nesting in SASS, plus a whole lot of advantages. Please find them out using the [link above](#bem).
```html
...
```
From the HTML file above, there's a strange element named `template`.
```HTML
```
If you've seen this element before, very good, if not all it does is hide the child elements from the browser and can only be shown using Javascript by adding it to the DOM (Document Object Model).
I got the idea of using the `template` element from an article I read, sadly I can't find it.
> From MDN, the `template` element is a mechanism for holding HTML that is not to be rendered immediately when a page is loaded but may be instantiated subsequently during runtime using JavaScript.
> Read more about the [template element here](https://developer.mozilla.org/en-US/docs/Web/HTML/Element/template)
Also, if you've ever seen a Vue.js source code, you'll notice the `template` element is used.
** Why I used the template element **
I used the `template` element to hide its child elements from the DOM (Document Object Model) until a certain action/event is done using JavaScript which then appends the child elements of the `template` element into the DOM. The implementation is done in the Javascript section.
### SASS
As for the styling of our project, we'll be making use of the `scss` extension which is more like writing CSS but still with all the `SASS` features.
> If the statement above seems confusing, then please read this article - [Write CSS with Superpowers Using Sass.](https://favouritejome.hashnode.dev/write-css-with-superpowers-using-sass) where I've covered the differences between `SCSS` and `SASS`.
Here the folder structure of all the `scss` file used in the project.
```
scss
| _base.scss
| _components.scss
| _desktop.scss
| _medium.scss
| _mixins.scss
| style.scss
```
The `_` before the `scss` file, symbolises it's a partial file, which means it should not be compiled until when used in the main `style.scss` file.
- `_base.scss` contains styles such as resets and typographic rules, which are commonly used throughout your project.
- `_components.scss` contains all the CSS that handles the layout.
- `_desktop.scss` contains all the CSS rules for the desktop view.
- `_medium.scss` contains all the CSS rules for the tablet view.
- `_mixins.scss` contains all the mixins created for the project.
> [Click here to know more about mixins](https://favouritejome.hashnode.dev/write-css-with-superpowers-using-sass#mixins)
- `style.scss` contains all the imports for the above files.
The two main features of Dart SASS I got to try out was `@use` rule and `@forward` rule.
- The `@use` rule loads mixins, functions, and variables from other Sass stylesheets, and combines CSS from multiple stylesheets together while
- The `@forward `rule loads a Sass stylesheet and makes its mixins, functions, and variables available when your stylesheet is loaded with the @use rule.
The two rules mentioned above are part of the newer features of Sass, which is to replace the use of the `@import` rule.
### JavaScript
Javascript, the brain of the project! Before diving into the functionality of the game, here's a breaking down of how the game should be implemented.
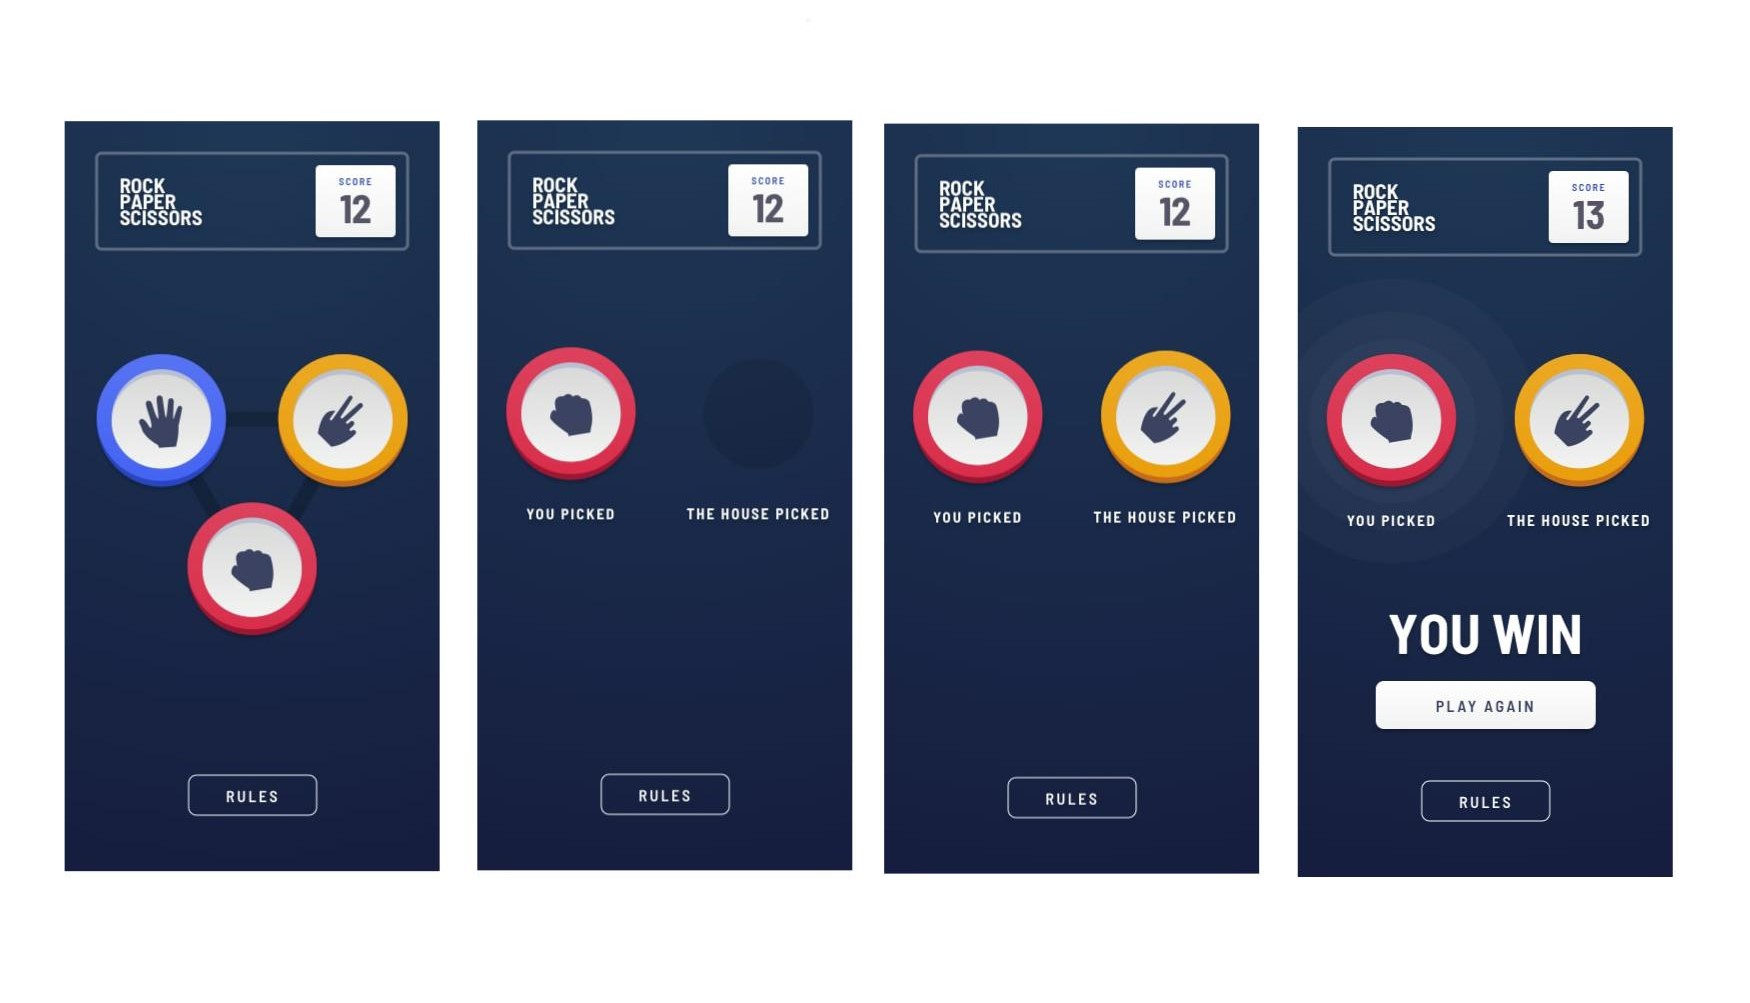
From the image above, you'll notice there are steps needed to be taken, before declaring the winner. The user will have to click on either the Rock, Paper or Scissors button. Then after a few seconds, the computer makes its choice and then finally a winner is declared.
As for the score for the game, I decided to implement it this way, if a user wins the score should be incremented by 1 (+1) while if the computer wins the score should be decremented by 1 (-1).
Now let's dive into the program.
```js
// selecting the DOM
function select(name) {
return document.querySelector(name);
}
function selectAll(name) {
return document.querySelectorAll(name);
}
const rulesBtn = select('#rules');
const closeBtns = selectAll('.closeBtn');
const rock = select('#rock');
const paper = select('#paper');
const scissors = select('#scissors');
const scoreResult = select('#score');
const modal = select('#modal');
```
From the above code, two functions were declared `select()` and `selectAll()`, which returns `document.querySelector(name)` and `document.querySelectorAll(name)` respectively. Using this functions, enables me to select my DOM elements quickly and by typing less.
Also this way I'm following the Functional Programming paradigm rules, which are
- Using Pure Functions: Pure Functions are the functions that depend only on their input and nothing else i.e they'll have some input values and based on those input values they'll always return an output. From [Functional Programming with JavaScript](https://saurabhkamboj.hashnode.dev/functional-programming-with-javascript) by @[Saurabh Kamboj](@saurabhkamboj)
- Avoid Side Effects: Side effects are a modification to the outside world, avoid interacting with the global scope.
> There are many more rules, to learn more read these articles [Functional Programming with JavaScript](https://saurabhkamboj.hashnode.dev/functional-programming-with-javascript) and [Master the JavaScript Interview: What is Functional Programming?](https://medium.com/javascript-scene/master-the-javascript-interview-what-is-functional-programming-7f218c68b3a0)
Next off, a variable `score` is declared having a function `lS()` which is invoked. The function `ls()` checks if the key `score` is added to the localStorage. If the key exists then the value is returned as a Number else `0` is returned.
On the next line, the `scoreResult.innerHTMl` has its value also to the function `ls()` which return the score from the localStorage.
Then several event listeners are declared.
```js
var score = lS(0);
scoreResult.innerHTML = lS(0);
// LocalStorage functionality
function lS(initialValue) {
const localData = localStorage.key('score');
return localData ? Number(localStorage.getItem('score')) : initialValue;
}
// Event Listeners
rock.addEventListener('click', playGame);
paper.addEventListener('click', playGame);
scissors.addEventListener('click', playGame);
rulesBtn.addEventListener('click', () => openCloseModal(modal));
closeBtns.forEach(closeBtn => {
return closeBtn.addEventListener('click', () => openCloseModal(modal));
});
```
Notice that `rock`, `paper` and `scissors` variables which are the buttons (_actually I used the div element with the role of a button in the HTML file but I'm just going to call it buttons because it's clicked on_) clicked on by the user to initiate the game has a function to its event listener named `play games.
```js
function playGame() {
const userChoice = this.id;
const computerChoice = computerRandom(['rock', 'paper', 'scissors']);
const game = select('.game');
const {userButton, computerButton} = gameTemplate(userChoice, computerChoice);
const result = rules(userChoice, computerChoice);
game.classList.add('max__width');
setTimeout(() => {
if (result === 'win') {
scoreResult.innerHTML = add();
userButton.classList.add('winner__boxShadow');
}
if (result === 'lose') {
scoreResult.innerHTML = subtract();
computerButton.classList.add('winner__boxShadow');
}
}, 400);
return winLose(result);
}
```
Now let's go over the function to figure out how it works.
- Line 1 in the function `playGame()` : `const userChoice = this.id;`
This is to get the users choice, since multiple buttons have the same function, we'll need to know what button was clicked.
That's why the `this` keyword is used to get the attribute on the element `id`.
So if the rock button is clicked `
...
` the `id ` attribute will be returned.
- Line 2 in the function: `const computerChoice = computerRandom(['rock', 'paper', 'scissors']);`
Here a function `computerRandom()` is invoked with its argument as an array that randomly gets an item from the parameter array.
```js
function computerRandom(games) {
return games[Math.floor(Math.random() * games.length)];
}
```
- At line 5:
`const {userButton, computerButton} = gameTemplate(userChoice, computerChoice);`
The function `gameTemplate()` which will be returning an object is where all the magic happens. Here's the function that takes the contents of the `template` element and adds it to the DOM
```js
function gameTemplate(userChoice, computerChoice) {
if ('content' in document.createElement('template')) {
const game = select('.game');
const template = select('#gameTemplate');
game.style.backgroundImage = 'none';
game.children[0].style.display = 'none';
game.children[1].style.display = 'none';
const clone = template.content.cloneNode(true);
const gameButton = clone.querySelectorAll('.game__button');
gameButton[0].classList.add(`game__button--${userChoice}`);
gameButton[0].children[0].children[0].src = `./images/icon-${userChoice}.svg`;
gameButton[1].style.backgroundColor = 'rgba(0, 0, 0, 0.15)';
gameButton[1].children[0].style.display = 'none';
setTimeout(() => {
gameButton[1].children[0].style.display = 'flex';
const img = document.createElement('img');
img.setAttribute('src', `./images/icon-${computerChoice}.svg`);
img.setAttribute('alt', `icon-${computerChoice}`);
gameButton[1].classList.add(`game__button--${computerChoice}`);
gameButton[1].children[0].appendChild(img);
}, 400);
game.appendChild(clone.firstElementChild);
return {userButton: gameButton[0], computerButton: gameButton[1]};
}
}
```
_I'm sorry I wouldn't go over everything in this function line by line, but I'll go over the main functionalities._
Okay then let's exact the main statements from the above function
```js
function gameTemplate(userChoice, computerChoice) {
if ('content' in document.createElement('template')) {
const game = select('.game');
const template = select('#gameTemplate');
const clone = template.content.cloneNode(true);
const gameButton = clone.querySelectorAll('.game__button');
gameButton[0] // userChoice Button
gameButton[1] // computerChoice Button
setTimeout(() => {
gameButton[1]
....
}, 400)
game.appendChild(clone.firstElementChild);
return {userButton: gameButton[0], computerButton: gameButton[1]};
}
return;
}
```
From the function above there's a check if `'content'` exist `document.createElement('template'))` which checks if the browser supports the template element.
Next off, the element with the class of `.game` is selected, then id of `#gameTemplate`. On the next line `const clone = template.content.cloneNode(true);`, this is to ensure we can clone the contents in the `template` element.
Then the `gameButton` is selected from the clone. Where `gameButton[0]` is the users button
and `gameButton[1]` is the computer button. Also notice, there's a delay of 400ms on `gameButton[1]` so that it appears as if that it takes some time to compute.
Next off, the `clone` element gets appended to the `game` element via the DOM and both `gameButton[0]` and `gameButton[1]` are returned in an object. `{userButton: gameButton[0], computerButton: gameButton[1]}`
- At line 6 in the `playGame()` function: `const result = rules(userChoice, computerChoice);`
We'd notice another function `rules()` which is being invoked with the arguments`userChoice, computerChoice`.
```js
function rules(userChoice, computerChoice) {
if (userChoice === computerChoice) {
return `draw`;
}
switch (userChoice) {
case 'paper': {
return computerChoice === 'rock' ? 'win' : 'lose';
break;
}
case 'rock': {
return computerChoice === 'scissors' ? 'win' : 'lose';
break;
}
case 'scissors': {
return computerChoice === 'paper' ? 'win' : 'lose';
break;
}
}
return null;
}
```
All the function does is to determine who wins, loses and if it's a draw.
- At line 20, the returned function is invoked `winLose(result)` with the result as its argument.
This function is to determine the message that will be prompted out if the user wins, loses or if its a draw.
Also the function returns a variable `playAgain` with the event listener which when clicked on the game is played again.
```js
function winLose(result) {
const playAgainBtn = select('#playAgain');
const playAgain = select('.play__again');
const game = select('.game');
const winLoseDraw = select('#winLoseDraw');
setTimeout(() => {
playAgain.style.display = 'block';
if (result === 'win') {
winLoseDraw.innerHTML = 'You Win';
}
if (result === 'lose') {
winLoseDraw.innerHTML = 'You Lose';
}
if (result === 'draw') {
winLoseDraw.innerHTML = "It's a Draw";
}
}, 400);
return playAgainBtn.addEventListener('click', () => {
playAgainFn(game, playAgain);
});
```
OMG, that's a lot of information to process, I know. From the above steps, we've covered all the main functions that make the game work.
Once again here's the:
- [Live Demo](https://rock-paper-scissors-game-zeta-one.vercel.app/)
- [Github code](https://github.com/jomefavourite/Frontendmentor_rock-paper-scissors-master)
## Resources
- [Different types of dependencies in a Node.js application explained](https://javascript.plainenglish.io/what-the-dependency-types-of-dependencies-in-a-node-js-application-explained-904a5424fbd3#:~:text=These%20are%20the%20packages%20that,may%20use%20npm%20i%20package_name)
- [Structuring your Sass Projects](https://itnext.io/structuring-your-sass-projects-c8d41fa55ed4)
- [Write CSS with Superpowers Using Sass.](https://favouritejome.hashnode.dev/write-css-with-superpowers-using-sass)
- [Functional Programming with JavaScript](https://saurabhkamboj.hashnode.dev/functional-programming-with-javascript)
- [Master the JavaScript Interview: What is Functional Programming?](https://medium.com/javascript-scene/master-the-javascript-interview-what-is-functional-programming-7f218c68b3a0)
## Conclusion
Was I able to accomplish my set goals for this project, I'd say yes. I did approach the program functionalities in a Functional Programming way, at least to my best abilities even though I know not all functions I used were pure. But hey! I did my best 😁. I also made use of BEM, SASS and plain JS.
If you've read so far, thank you very much, I hope you've learnt something.
So if you have any feedback, question, advice or any at all you could comment down below or reach me on [Twitter](https://www.twitter.com/@favouritejome1)
See you next time✌.


